This simple do-it-yourself planter has a water reservoir from which water moves to the potting soil by capillary action. I use this planter for both conventional growing using potting soil and for a bit of hydroculture, and find it very useful. Here's how to re-use a plastic bottle to make one of these "self-watering" pots.
1. Gather the required materials.You will need a clean, empty plastic bottle together with its cap, a pair of scissors, a metal skewer
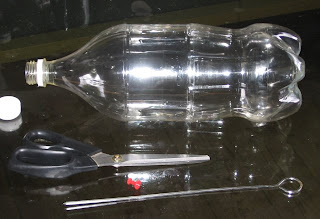
or nail, a push pin (drawing pin), and a small scrap of fabric or string to serve as a wick.
The general idea is that you cut the top section off the bottle, turn the cut-off part upside down, then insert the cut-off part in the bottle base so that the cap touches the bottom of the bottle. (See picture at Step 3). The top part must fit snugly inside the bottom part with no gaps around the edges where the potting mix would fall through, so cut the bottle at a place where the diameter of the top part will match the diameter of the lower part. Before cutting, you can check diameters with a piece of string if the bottle has fancy curves in it.
2. Cut the top part (the Head and Shoulders) off the bottle.Use the push pin to

make a row of 5 holes where you want to begin cutting. Make the holes almost touching each other so they will tear easily when you push the point of the scissors against the perforation. With the scissors, cut around the the bottle as evenly as possible.

Starting with the little perforations means that you are less likely slip with scissors and injure yourself than if you tried to hack into the plastic using only the scissors, and the perforations also enable you to position a cutting line with literally pinpoint accuracy.
 3. Check that the top section fits snugly into the bottom of the bottle.
Invert the cut-off top section into the lower part of the bottle.

If the cap does not touch the bottom of the bottle, then trim the top section along the cut edge until a snug fit can be achieved. (If the top section is too small - with gaps between its edges and the sides of the lower bottle - you can't fix it easily. Get another bottle and begin again. ;-)
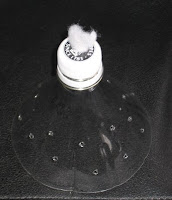
4. Make airholes / drainage holes in the top section.Use the push pin to puncture 12 or 15 holes randomly around the shoulder part of the bottle. Use the skewer or nail to make each hole a bit larger,

but not so large that soil will wash through.
These holes will allow water to drain from the potting soil, and for air to reach plant roots.
5. Make a hole in the bottle cap.I do this directly with the skewer without "predrilling" with the push pin. I put the bottle cap on the concrete floor with the cap's top facing upwards (so it looks more like a table than a cup, if that makes sense) and just stab it. If the bottle cap you are using is very tough then you might have to use a hammer and nail - or a drill, of course, if you have one handy, but these instructions are intended to be low-tech.
 6. Poke the string or fabric through the hole in the bottle cap.
The wick in the photograph is polyester fibre recycled from an old cushion. Many materials could be used to make a wick - string, a short length of old pantihose, or a strip of fabric about 1 centimetre wide and 3 or 4 centimetres long. The wick is not strictly necessary but is useful because it can retrieve the last drop of water from the reservoir. Most plastic bottles are not completely flat-bottomed, and the centre area where the bottle cap rests is higher than the edges, so when the reservoir is nearly empty the bottle cap will not be in contact with water unless a wick is used.
The skewer is all I have ever needed to push the wick through the hole but sometimes it has taken a bit of twiddling. A small crochet hook might be helpful.
7. Screw the bottle cap on. The cap does not need to be screwed very tightly. I leave the cap loose e
nough so that water can enter here as well as through the wick, for built in redundancy of the water supply.
This part of the planter is now assembled.
8. Cut an overflow hole in the side of the bottle.About 4 to 5 centimetres (1.5 to 2 inches) above the bottom of the bottle, pierce a row of 5 closely spaced holes with the push pin. With the scissors, push into these performations and cut a small hole in the side of the bottle. Make the hole approximately the same diameter as your fingertip.

The size and shape of the hole doesn't matter, although its position in the side of the bottle is important. If it is low, then the reservoir will not hold much water and will have to be refilled more frequently. If the hole is high, then the potting soil will not drain well - although you may want that if you plan to grow a water-loving plant in the pot.
9. Invert the bottle top and fit it into the bottle base.Now you can fill the container with potting soil and plant something.

These planters are excellent for starting seeds or cuttings because they keep the potting soil uniformly moist, which means fewer failures caused by either drying out or overwatering.
WateringIn cool weather and with smallish plants, these planters contain enough water to last at least a week without needing to be refilled. However, in summer I refill mine every fourth day. I think that mosquitoes could possibly breed in the planter reservoirs and I want to prevent that. So every fourth morning I tip out the old water from each planter, allow them to dry out for an hour or so, then refill with clean water. I refill by lowering the planter base-first into a bucket of water. Water flows in through the overflow hole and fills the reservoir to the correct level, so I don't have to measure the amount of water added to each planter. If you were to use these planters to grow indoor plants, I am sure that you would not have to refill for at least a week.
Don't like the bare bottle look?It may be desirable to cover the outside of the planters. Plant roots may need to be protected from overheating caused by sunlight shining through the clear plastic walls of the planter. The plastic may break down when exposed to ultraviolet light from the sun. I am trialling several materials as covers for planter bottles. The most successful so far has been aluminium foil but I also like recycling potato crisp packets and other bags made of shiny "metallised" plastic. I cut the top and bottom off one of these bags to make a sleeve the same height as a planter then slip the sleeve over the planter. The fit should be loose enough to allow easy access to the overflow hole, and snug enough so the cover won't blow off in a breeze. The bags seem to make excellent covers but I have only used them for a few weeks and don't know how long they will last when exposed to strong sunlight.
Recycled gift wrap (plasticised type) might also make good covers, as might waxed cardboard boxes, old plastic tablecloth, and leftover building materials such as paint, waterproofing membranes, or vinyl sheets. Fastening a sheet of material around a planter is probably best done with string or ribbon unless you have a good quality sticky tape, because the adhesive in cheap sticky tape seems to break down quickly.
Planters can be grouped in a tub, box or basket for an attractive display in which the pots do not need individual covers. There are lots of low-cost possibilities for decorative covers so your garden or patio does not have to look like a bottle recycling centre (unless you want it to).
I like this type of planter so much that I am working on extending the idea. I am devising a strawberry tower / herb tower from plastic milk bottles, using the same water well principles. This time I will try to make the water reservoirs mosquito-proof, so am still working on refining the basic design but will post results fairly soon. Watch this space.
 they often look like aliens. Elephant's Foot also looks suitably intergalactic.


